Super-VGA Harrier: Staging from a carrier
- Nov 9, 2025
- 6 min read

A guide to running the Domark, sim Super VGA (SVGA) Harrier in DOSBox Staging. Released in 1993, Super VGA Harrier is the upgraded version of AV-8B Harrier Assault, released only a year previously in 1992.
Retaining the same setting, of East Timor and continuing to combine both a flight sim, with an upgraded SVGA engine, and a strategic campaign which remains unchanged from the original.
This game is the second in the Domark Harrier 'series', with:
AV-8B Harrier Assault, 1992 (PC, DOS, VGA, Amiga, Atari ST).
Super-VGA Harrier, 1993 (PC DOS, SVGA).
Flying Nightmares, 1994 (Macintosh, 3DO).
Releases & patches
There is only a single retail release on floppy or CD-ROM, although the games would be included on several compilations. There are no patches for SVGA Harrier.
Retail media
This guide assumes any physical floppy disks or cds will be ripped to an image file, to reduce wear and tear on media and the disk/cd drives. The floppy disks can be ripped to an img image format. The cd can be ripped to an iso (data only) cd image format as there are no cd audio tracks present on the cd.
Game management
I recommend using my DOSBox game management strategy. The following folders are recommended:
conf - to store any DOSBox Staging/HOTAS profile configuration files.
docs - to store any useful documents, manuals, etc.
cd - to store any cd images (optional, depending on media).
fdd - to store any floppy disk images (optional, depending on media).
hdd - the DOSBox Staging hard disk folder.
HOTAS config
Joystick, throttle and rudder pedals are supported. Configuring axes may not be required if your HOTAS has 4 axes or less. When using devices totaling more than 4 axes, a virtual controller can be used, limited to 4 axes.
For those using controllers from multiple vendors, the vJoy/Joystick Gremlin combination may be required instead of vendor specific HOTAS profile software.
The physical axes to Windows axes were configured as follows:
Physical axis | Windows axis |
Joystick x-axis | DX_X_AXIS |
Joystick y-axis | DX_Y_AXIS |
Throttle | DX_Z_AXIS |
Rudder | DX_XROT_AXIS |
DOSBox Staging config
This guide assumes the latest version of DOSBox Staging v0.82.2. Changes from the default configuration are detailed below:
[sdl]
host_rate           = vrr
vsync               = off
presentation_mode   = vfr

[dosbox]
dos_rate                    = 1000

[cpu]
cpu_cycles           = 20000
cpu_cycles_protected = auto
cycleup              = 100
cycledown            = 100

[voodoo]
voodoo                    = false

[mouse]
dos_mouse_immediate       = true

[mixer]
reverb		= medium
chorus		= normal

[midi]
mididevice      = mt32

[mt32]
model       = cm32l
romdir      = "D:\Midi\Versioned"

joysticktype                = 4axis
timed                       = false
swap34                      = true
deadzone                    = 0

[autoexec]
imgmount a "D:\Games\Dos\SVGA HArrier\fdd\*.img" -t floppy -ro
imgmount d "D:\Games\Dos\SVGA HArrier\cd\SVGAHarrier.iso" -t cdrom
mount c "D:\Games\Dos\AV-8B Harrier Assault\hdd"

c:
# cd harrier

# Game batch files
# call harrier.bat
# call harfly.bat
# exit

# Game launcher menu
# call harmenu.bat
The [sdl], [dosbox] and [mouse] settings are suitable for high frame rate gaming as described in this article by Omniclyde. These settings aren't strictly required and can be omitted to use the default settings.
In [cpu] settings, 20000 cycles seems appropriate, you may need to tweak this setting but this seems like a good starting point.
The cpu_cycles_protected setting will use the same cycle count as cpu_cycles and must be set to auto, otherwise the sim will run far too quickly at the default 60000 cpu_cycles_protected setting.
Voodoo emulation isn't required and can be disabled.
The [mixer] settings can be changed to enhance sound and music to personal preference.
The [midi] and [mt32] settings enable high quality Roland midi music. The model value, auto, will default to a CM32L device. SVGA Harrier supports the LAPC1 sound card which is equivalent to a CM32L device. The midi roms folder is described in the DOSBox midi article.
The [joystick] settings are appropriate for my HOTAS setup so you may need to alter these. The swap34 setting is recommended to be set to true, due to the calibration process (see In-game configuration below). The deadzone setting is a personal preference.
The [autoexec] has example imgmount commands for the floppy images. As there are multiple floppy images the imgmount command uses the '*' wildcard. The imgmount and mount commands make use of a folder structure described in my DOSBox game management article.
You may wish to change the batch command used to run the game, once installed (see Running the game below) or use the game launcher menu (see Changing sound options).
Installation
The installation methods from floppy disk and cd will result in two different install folders. Both installations should be run from within DOSBox.
From floppy disk image
The following command will run the floppy installer which copies all files to the hard disk. When asked for the next disk use <Ctrl> + F4 to switch to the next disk image.
A:\> installDuring the installation you be asked to select from the following:
Drive to install to: C: Drive.
Folder to install to: Use the default \harrier folder.
Full or small install: Full.
Graphics: VESA Standard SVGA card.
Sound: Use SoundBlaster or Roland sound driver.
From cd image

The cd installation was created during a time when hard disk space was at a premium and the files were already on the cd. The cd install will add config files and sound files to the hard disk while keeping most game files on the cd.
In addition the cd install requires installation choices for drive, graphics and sound to be made. To view the options, run the installer without any arguments, with:
D:\> installTo install with a VESA standard SVGA card and Roland sound use the following:
D:\> install c: v rTo install with a VESA standard SVGA card and SoundBlaster sound use the following:
D:\> install c: v sWith this method the cd image must remain mounted in DOSBox.
Adding files to the hard disk
To run the game without the cd image mounted, the following steps are required:
Perform the cd installation, described above.
Copy the following files and folders from the cd into the SVGA Harrier installation folder on the hard disk (this can be done from Win10):
D
D1
D2
DC
DG
SOUND
ERRATA.TXT
FLY32.EXE
FLYX.EXE
INTRO.ANM
MANUAL.BATMANUAL.TXT
README.EXE
README.LIB
README.TXT
VEREdit the following files as shown below:
HARRIER.BAT

@echo off
c:\harrier\sndtsr.exe
d:\   # remove this line
call c:\harrier\anim.bat
call c:\harrier\fly.bat
HARFLY.BAT
@echo off
c:\harrier\sndtsr.exe
d:\ # remove this line
call c:\harrier\fly.batRunning the game
Depending on the type of install (floppy or cd) the commands to run SVGA Harrier are different. For floppy:
c:\harrier> av8b.bat         # with intro
c:\harrier> av8bfly.bat      # without intro
For a cd install:
c:\harrier> harrier.bat      # with intro
c:\harrier> harfly.bat       # without intro
In-game configuration
When starting the game for the first time, you'll need to configure and calibrate axes. There is a config page available from the command page in-game. The throttle and rudder pedals should be set as shown in the screenshot.
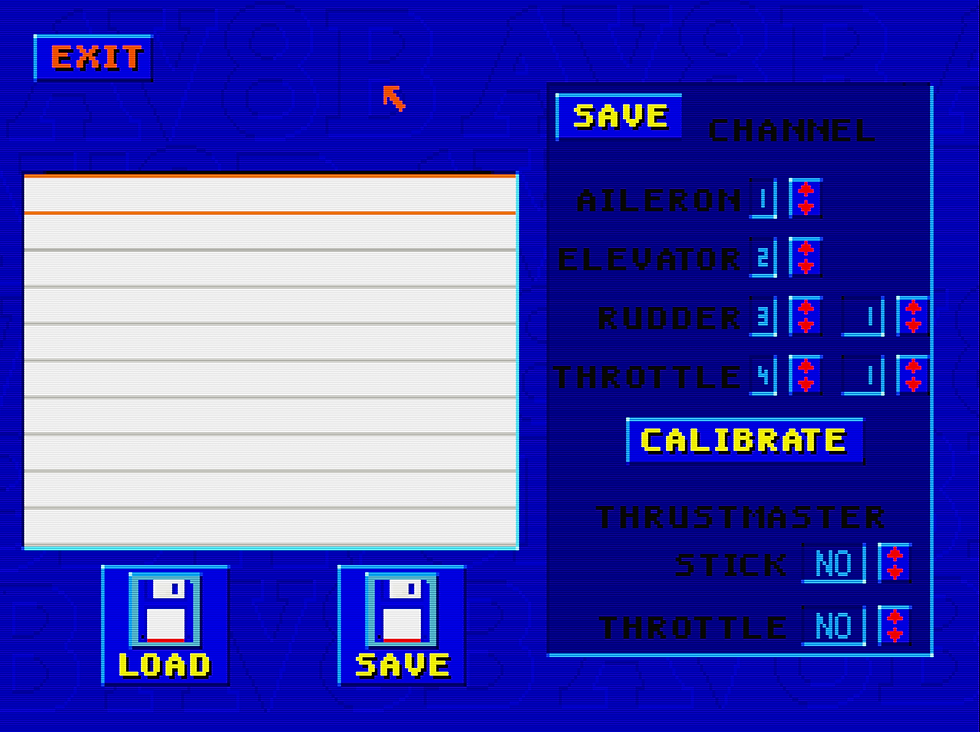
Rudder should be on channel (axis) 3.
Throttle should be on channel (axis) 4.
Thrustmaster stick and throttle should be left as no.
The DOSBox config swapped axes 3 and 4 to ensure when the calibrate option is used the throttle appears in the vertical calibration scale and the rudder appears on the horizontal calibration scale.
When calibrating, the throttle and rudder pedals will need to centred and should either be able to reach (or come close to) either end of their respective scales. You may need to adjust the throttle centre position and calibrate a couple of times. Once calibrated to your liking, click (channel/axis) save,
Changing sound options
To change sound options for a floppy install simply run the floppy installer again and select the alternate sound options to use.
Changing sound for a cd install is more difficult as the cd installer will only install the game if the harrier folder cannot be found. There is no utility or batch file allowing sound options to be changed. Instead I have created a launcher that will:
Start the game with the intro.
Start the game without the intro.
Change to Roland sound.
Change to SoundBlaster sound.
Return to a DOSBox DOS prompt.
Close DOSBox.
Update: The launcher menu no longer needs the cd mounted if files were added to the hard disk.
The zip file below should be extracted and the launcher batch file added to:
c:\harrierAnd run with:
harmenu.batDocumentation
Documentation is identical to the original AV-8B Harrier Assault, which include:
The manual in pdf format.
The reference card as an image.
The campaign map as an image.

Finally...
Despite losing the 320x200 resolution Microprose like charm of the original, you do gain the improved SVGA graphics. Whichever one you decide to use, there are articles to help you run either (or both)!
Good hunting!

Comments