A-10 Cuba! No risk of a fubar!
- 5 hours ago
- 9 min read

A guide to running the Parsoft developed Fairchild Republic A-10 Thunderbolt II sim, A-10 Cuba!, initially released in 1996 and published by Activision. The sim features a comprehensive physics based flight model, damage model and detailed cockpit at the time of release.
Lacking the mission editing present in the Mac version, the Windows version is often considered the lesser release. However, the Windows version supports stick, throttle and rudder while the Mac version, requiring emulators to run on Windows, is restricted to stick only, making the Windows version a better flying experience on a Windows platform.
Much of the weapon deployment is more manual in nature with less reliance on computerized systems making it very much a pilot's sim. Despite its age, the sim is relatively straightforward to get running under Win10.
This guide will be dealing with the Windows version only, running the Mac version under emulation is not covered in this guide.
Strategy
Due to the 16-bit game and patch installer apps, installation requires a little more care. The initial v1.0 retail release should be installed and patched to the latest v1.2 version. The later Activision Essentials Collection re-release is already pre-patched to v1.2 and only requires installation.
High resolution displays and A-10 Cuba menus also require some consideration. However most issues are minor and can be resolved easily. Ensuring documentation is accessible on Win10 will also be covered.
Version and patch history
Version and patching requires a little more care due to the different patching paths than can be taken to reach the recommended version. This guide will detail the patches available and the minimum amount of patching required to meet the recommended version.
Initial retail release
The initial retail release was published by Activision in 1996 as version 1.0. Distributed on a single CD-ROM it uses a 16-bit installer that is no longer compatible with Win10, requiring the use of the OTVDM tool.
Version 1.0 to Version 1.0.1 patch
The Version 1.0 to Version 1.0.1 patch seems to have been released in December 1996. This patch was released without release notes so it's not clear what was changed but due to the size and release date it may have been a bug fix patch.
The patch is distributed as a zip archive containing a self-extracting archive or as a self-extracting archive only. The patch uses a 16-bit installer, so must be installed with the OTVDM tool. This is not a recommended patch as the Version 1.0 to Version 1.2 patch provides a simpler upgrade path.
This patch is available from:
Internet Archive
Version 1.0 to Version 1.2 patch
The Version 1.0 to Version 1.2 patch seems to have been released in February 1997. This patch was released as a bug fix and enhancement patch. The release notes are included below:
The patch is distributed as a zip archive containing a self-extracting archive. The patch uses a 16-bit installer, so must be installed with the OTVDM tool. This is a recommended patch for the initial retail release.
This patch is available from:
Internet Archive
Version 1.0.1 to Version 1.2 patch
The Version 1.0 to Version 1.0.1 patch seems to have been released in December 1996. The release notes are identical to the Version 1.0 to Version 1.2 patch.
The patch is distributed as a zip archive containing a self-extracting archive. The patch uses a 16-bit installer, so must be installed with the OTVDM tool. This is not a recommended patch as the Version 1.0 to Version 1.2 patch provides a simpler upgrade path.
This patch is available from:
Internet Archive
Essentials Collection re-release
The Essentials Collection re-release was published by Activision in 1996 pre-patched to version 1.2. Distributed on a single CD-ROM it uses a 16-bit installer that is no longer compatible with Win10, requiring the use of the OTVDM tool.
As it is already pre-patched, no further patches are required, making it the preferred version to install.
Patching strategy
The recommended patching strategies to bring each release to version 1.2 are straightforward and shown below:
Install initial retail release (v1.0) and apply Version 1.0 to Version 1.2 patch (v1.2).
Install Essentials Collection re-release (v1.2), no further patching required.
Retail media
This guide assumes any physical cds will be ripped to an image file, to reduce wear and tear on media and drives. The retail version of A-10 Cuba! does not contain cd audio and can be ripped to a data only .iso format.
At present there is no release of the game on digital platforms.
Game management
As a windows game running natively, the installation folder some limited game management is still useful for files used in the A-10 Cuba! setup.
The installation folder and setup files for A-10 Cuba! and other Windows games can be found in the same folder (my own, as an example):
D:\Games\Win\<Game folders>
D:\Games\Win\A-10 Cuba Setup
The following setup folders can be used:
cd - to store any cd images.
conf - to store any HOTAS profile configuration files.
docs - to store any useful documents, manuals, etc.
patch - to store a copy of recommended patches/tools.
Installation setup
OTVDM, also known as WineVDM, is a port of the Wine project that allows you to run old 16-bit Windows applications on modern 64-bit Windows operating systems. This utility allows the installer app to run under WIn10.
OTVDM also includes a winhlp32.exe utility, which allows opening old style Windows help files on 64-bit Windows, including the A-10 Cuba! help files, which acts as a manual.
The latest version of OTVDM/WineVDM is v0.9.0 available from the WineVDM GitHub, found in Releases. As it is distributed as a zip file, installation only requires extracting the files to a suitable folder of your choosing.
Installation & patching
Installation folder
The first step of installation is to create an A-10 Cuba! installation folder manually. It is done manually as the folder selection dialog used in setup process, has compatibility issues, so it can select a folder but not create one. The default folder name is preferred (A-10Cuba).
For the remainder of this guide the following example installation folder is assumed:
E:\A-10CubaInstalling with OTVDM
The steps to install A-10 Cuba! using the OTVDM tool are:
Mount the A-10 Cuba! CD or CD image in WIndows.
From the OTVDM installation folder run the OTVDM tool (otvdmw.exe) and use it to open the A-10 Cuba! installer app (setup.exe) from the mounted CD/CD image.
The setup will begin. Each step of the installation process is shown in the gallery below. This should be a straightforward process, when used in conjunction with the notes below:
Registration is optional, so select Register Later.
When checking System Requirements, any warnings can be ignored.
When selecting an installation folder location, choose the manually created installation folder (A-10Cuba folder).
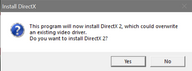
When asked to install DirectX 2 select No. It is important to choose correctly!


Patching with OTVDM
This step is only required when patching the initial retail release to v1.2. The Essentials Collection release is already pre-patch to v1.2 so this patching is not required. The steps are:
If the Version 1.0 to Version 1.2 patch is distributed as a zip file (or other compressed archive file), unzip the contents to a folder of your choosing.
From the OTVDM installation folder run the OTVDM tool (otvdmw.exe) and use it to open the patch executable. This may be named a10p1_2.exe, a10pfr_2.exe or similar.
Patching should begin and complete successfully.
Adding the DirectPlay library

A-10 Cuba requires the DirectPlay library, without it the following error is seen when the game is run (see screenshot).
To add the library:
Copy the dplayx.dll library from the following location into the A-10 Cuba! installation folder.
C:\Windows\SysWOW64\Rename this file (in the A-10 Cuba! installation folder) to dplay.dll.
Wrapper utilities
This guide uses the latest version of dgVoodoo2, version 2.86.5 (at time of writing). This can be obtained from the dgVoodoo2 GitHub repository in Releases. To install:
Download dgVoodoo2 (dgVoodoo2_86_5.zip) and extract to a new folder.
Copy the following dgVoodoo2 files to the A-10 Cuba! installation folder. Note: the paths are not important you just need to add the files:
dgVoodooCpl.exe
MS\x86\D3D8.dll
MS\x86\D3D9.dll
MS\x86\D3DImm.dll
MS\x86\DDraw.dll
Download and extract the dgVoodoo.conf in the below zip file, to the A-10 Cuba! installation folder:
HOTAS config
Joystick, throttle and rudder pedals are supported. Configuring axes may not be required if your HOTAS has 4 axes or less. When using devices totaling more than 4 axes, a virtual controller can be used, limited to 4 axes.
For those using controllers from multiple vendors, the vJoy/Joystick Gremlin/HidHide combination may be required instead of vendor specific HOTAS profile software. The vJoy/Joystick Gremlin/HidHide examples may help in configuring your HOTAS.
The physical axes to Windows axes were configured as follows:
Physical axis | Windows axis |
Joystick x-axis | DX_X_AXIS |
Joystick y-axis | DX_Y_AXIS |
Throttle | DX_Z_AXIS |
Rudder | DX_ZROT_AXIS |
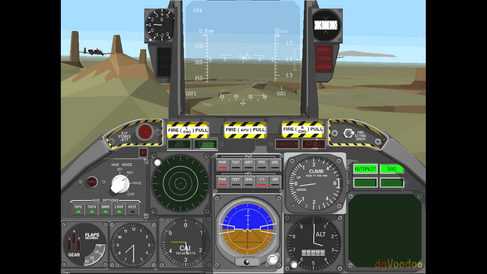
Running
When running A-10 Cuba! the menus are displayed in a dialog box style, with the Windows desktop visible in the background. With modern high resolution displays this may result in very small menus that are difficult to read.
The flight engine runs at a maximum resolution of 1024 x 768 (a 4:3 aspect ratio) which is taken care of by dgVoodoo2, however the menus remain unchanged due to the dialog box style.
Before playing, it is recommended to lower the monitor resolution to a resolution with the same aspect ratio as your monitors native aspect ratio (this would normally be 16:9 for a standard widescreen monitor) and at a resolution higher than 1024 x 768. This will result in readable menus and a flight engine running in the correct aspect ratio.
For example, a 4K monitor running at the native resolution of 3840 x 2160 has a 16:9 aspect ratio. A 16:9 resolutions higher than 1024 x 768 includes 1600 x 900 or 1920 x 1080. Using Playnite (a game library manager) and the Display Helper plugin or switching the resolution manually, results in a lower resolution with readable menus and a flight engine running in the correct 4:3 aspect ratio thanks to dgVoodoo2.


Configuration
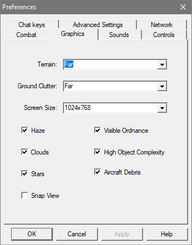
There are a number of in-game configuration settings that can be optimised for a modern Win10 platform. The following are recommended settings available in the in-game preferences:
Combat: Additional realism settings are set, and invulnerability settings are disabled, but this should be set to personal preferences.
Graphics:: All settings are maximised and enabled except for Snap VIew, allowing the internal cockpit view to scroll rather than snap.
Sound: All settings are enabled.
Controls: A joystick is set, other settings may depend on the HOTAS hardware being used.
Advanced Settings: The Network, Prediction setting can be reduced to the minimum 1.5s (15). The Misc, Joystick Queue can be reduced to a minimum (1), to increase joystick response.


Documentation
It is recommended to store copies of the documentation listed below in the game management, docs folder. The following additional documents may be useful:
A-10 Attack! Instruction Manual, pdf download.
Macintosh Repository, A-10 Attack!, manual-10.pdf
A-10 Attack! uses the same flight engine as A-10 Cuba! much of the advice remains relevant.
A-10 Attack! Unofficial Demo Manual v1.2, Tim van der Leeuw & Maury Markowitz, pdf download.
Steve's HOG HEAVEN, The Unofficial A-10 Attack Demo Manual
Unofficial manual for the A-10 Attack! demo. Techniques discussed are applicable to A-10 Cuba!
The A-10 Attack! FAQ Version 1.6, Petteri Sulonen, text file.
GameFAQs, A-10 Attack!, Guides, FAQ.
Much of the advice remains relevant to A-10 Cuba!
An A-10 Attack! primer Version 1.0.1, Petteri Sulonen, text file.
GameFAQs, A-10 Attack!, Guides, Primer.
Much of the advice remains relevant to A-10 Cuba!
Help files
The Windows version uses legacy help (.hlp) files as documentation. Win10 no longer supports these help files. The OTVDM tool includes a Windows help tool (winhelp32.exe) which displays legacy help files. The recommended course of action is to:
Copy the Windows help tool (winhelp32.exe) from the OTVDM installation folder into the A-10 Cuba! installation folder.
Create a shortcut from winhelp32.exe and edit the shortcut properties.
Add the help.hlp file as an parameter to the Target field, so it reads:
E:\A-10Cuba\winhlp32.exe help.hlpOpening this shortcut will now display the A-10 Cuba! help documentation.
There are other help files (game.hlp, vendor.hlp and win95net.hlp) but only help.hlp requires a shortcut as the other files are accessible from help.hlp.
This shortcut can be left in the A-10 Cuba! installation folder, copied or moved onto the desktop or into the game management docs folder.
Example video
Finally...
Credit and thanks go to:
Gamepressure, The Patches Scrolls and the Internet Archive for hosting patches.
Otya for the OTVDM and WIndows help utilities.
VOGONS member bringitback for the DirectPlay library advice.
dege for dgVoodoo2.
Macintosh Repository for hosting the A-10 Attack! manual.
Tim van der Leeuw & Maury Markowitz for the A-10 Attack! Unofficial Demo Manual v1.2 and to Steve Russillo for hosting it at Steve's HOG HEAVEN.
Petteri Sulonen for the The A-10 Attack! FAQ and Primer and to GameFAQs for hosting them.
Good Hunting!


Comments