F22 Air Dominance Fighter part 2: PCem build
- Nov 30, 2025
- 14 min read
Updated: Dec 5, 2025

This is the second F22 Air Dominance Fighter (F22 ADF) article. This article will be using PCem v17 to build a virtual machine that can be used to build an F22 ADF release and to optionally play it as well.
The first part will be a detailed look at the exact virtual machine used, as F22 ADF can be very particular about the hardware and operating system it runs on.
The following will be covered:
PCem background.
The virtual machine hardware.
The Windows operating system.
Windows drivers.
The second part of the article covers the complete setup of F22 ADF on the PCem virtual machine. It will cover:
Installing and patching F22 Air Dominance Fighter (F22 ADF).
Installing and patching F22 Red Sea Operations (F22 RSO). expansion.
Running and configuring F22 ADF.
Finally, a quick discussion on whether to run in PCem or Win10 and example video of playing in PCem.
Retail media
This guide assumes any physical cds will be ripped to an image file, to reduce wear and tear on media and drives.
Depending on the retail version of F22 ADF the cd may or may not contain cd audio. An original retail edition may contain cd audio, while a rerelease in an DVD style case may not. If you are unsure, it is recommended to rip the cd to a bin/cue image pair, to preserve any cd audio.
The expansion F22 RSO does not contain cd audio and can be ripped to a data only .iso format.
At present there is no release of the game on digital platforms.
Game management
As a windows game running under PCem emulation the VM and VM config sit under the PCem installation folder. However some limited game management is still useful for files used in the F22 ADF setup.
The setup files for F22 ADF and other Windows games can be found in the same folder (my own, as an example):
D:\Games\Win\<Game setup folder>
D:\Games\Win\F22 ADF Setup
The following folders are used:
conf - to store any HOTAS profile configuration files.
docs - to store any useful documents, manuals, etc.
patch - to store a copy of recommended patches.
cd - to store any cd images.
PCem emulator
This guide assumes the latest version of PCem v17 available from PCem Downloads or from PCem GitHUb Releases.
For those unfamiliar with PCem or would benefit from a refresher, I highly recommend the excellent YouTube tutorial video by PhilsComputerLab, PCem Windows 98 Setup. This video does not show the exact Virtual Machine (VM) being created but being familiar with the building process is very useful.
PCem is used in preference to 86Box due to the higher resource usage of 86Box. However for those with suitably high spec hardware, the virtual machine listed below can be created and run with 86Box, although this has not been tested.
PCem should be installed and working normally prior to continuing.
Virtual Machine (VM) hardware
The following is the hardware used by the virtual machine, in addition to the recommended hardware listed in the F22 ADF readme.
Recommended | PCem VM | |
CPU | Pentium P200 or higher | Intel Pentium II/233 |
Memory | 32MB | 64MB |
HDD space | 205MB | 510MB |
CD | 8 x CD-ROM drive | 24 x PCem CD |
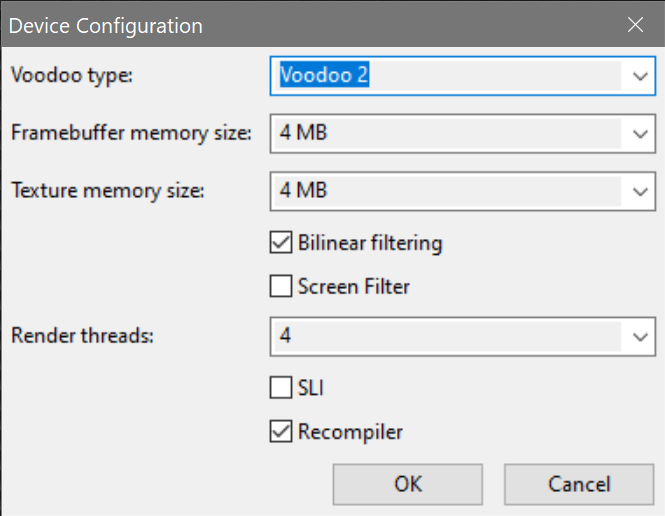
Video | AGP bus based 3D accelerator video card | S3 ViRGE/DX Fast VLB/PCI & Voodoo2 |
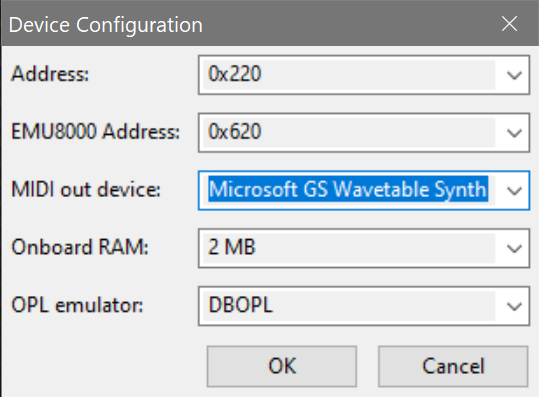
Sound | Creative Labs AWE32 or AWE64 card with 512k of memory | Creative Labs AWE32 with 2MB of memory |
Mouse | Microsoft Mouse or other Windows '95 compatible device | Microsoft Intellimouse (PS/2) |
As can be seen in the comparison, the VM hardware used is a higher spec but not widely different to the hardware supported by F22 ADF.
It's recommended to use 64MB of memory, higher amounts of memory introduce instability when running F22.
The disk size of 510MB was chosen to remain below the size required for large disk support that makes installing Win95 more difficult. It recommended to use a dynamically sized VHD hard disk type as it can be opened and mounted in Win10.
The largest soundfont used by F22 is 1.4MB therefore an AWE 32 with 2MB of memory is sufficient. The MIDI device can be left as the default Microsoft GS wavetable synth, it can be changed later.
The Voodoo2 was chosen over the Voodoo3, as the v5.144 patch adds further support for the Voodoo2 and subjectively, F22 seems more stable when using a Voodoo2.
The following is a gallery showing the required configuration.


Note: the joystick settings can be left as default and will be dealt with later. The network settings aren't used.
Configuration
When starting the virtual machine for the first time, it's recommended to change the following bios settings:
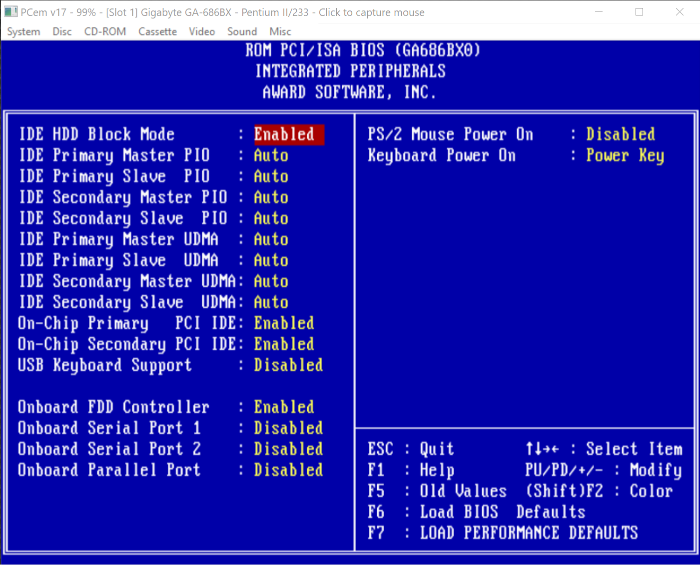
Load performance defaults.
Under Integrated Peripherals ensure the Onboard serial port 1, Onboard serial port 2 and Onboard parallel port are Disabled. They aren't required and can take up an interrupt (IRQ) (see screenshot right).
Save & exit setup.
Windows operating system
The next step is to install a suitable Windows operating system onto the VM. Windows 95 was chosen as this Windows OS was referenced in the F22 ADF readme, v5.144 patch readme and F22 RSO readme. It seems likely F22 was developed for Win95 so this seems like a good Windows choice for maximum compatibility.
Versions & images
A cd image of Windows 95 OSR 2.5 along with a Boot Disk 95 OSR2.x image was obtained from WinWorld.
Installation
It is beyond the scope of this guide to go into a detailed Win95 installation guide, however the following is a brief description of the steps taken:
Start the VM using the Boot Disk image. Within the VM, use fdisk to create a hard disk partition. Within the VM, format it with the format cmd /s switch, to copy system files and make the hard disk bootable.
Copy the Win95 setup.exe and Win95 folder onto the hard disk. This can be done in the VM or in Win10.
Within the VM, run the Win95 setup from VM hard disk. Complete the installation process.
The installation will complete but some of the hardware won't be recognised without suitable driver installation.
MS-DOS Prompt
Running the MS-DOS Prompt within Win95 will cause the virtual machine to crash, so running the MS-DOS Prompt should be avoided if possible. If MS-DOS is required then restart Win95 in safe mode.
If the MS-DOS Prompt is used to extract files from a '.exe' archive. Then consider trying to open the archive with 7zip in Win10 instead, and copy extracted files onto the VM hard disk, to avoid this issue.
Windows drivers
There are a number of Windows drivers required to make all the hardware accessible to Win95. The order below is the order in which the drivers should be installed.
The Intel chipset, S3 ViRGE, 3dfx Voodoo 2 and Creative AWE 32 drivers were supplied by PHILSCOMPUTERLAB.COM. Credit and huge thanks to Phil for finding and hosting these drivers.
Intel chipset drivers
These can be found in Intel chipset drivers, The Gigabyte GA-686BX motherboard used in the VM uses the Intel 440BX chipset, so the 3.20.1008.zip should be downloaded
The zip file can be opened in Win10 and the infinst_enu.exe file should be copied to the VM hard disk and run within Win95 on the VM.
Win95 will begin to detect many new devices and may restart a number of times.
S3 ViRGE/DX drivers
These can be found in S3 VIRGE. The file to download is s3_virge__325__vx__988__dx__375__gx__385__v3.12.01.zip.
The zip file can be opened in Win10 and the files extracted to an S3 folder. This S3 folder should be copied to the VM hard disk. Within Win95 use the Device Manager or Display Properties to update the driver and select the drivers present in the S3 folder.
3dfx Voodoo 2 drivers
These can be found in Drivers for Voodoo 2. The latest reference drivers, voodoo2-30202.exe should be downloaded.
The voodoo2-30202.exe file can be opened in Win10 with 7zip, and the files extracted to a Voodoo 2 folder. This Voodoo 2 folder should be copied to the VM hard disk. Within Win95 use the Device Manager to update the drivers and select the drivers present in the Voodoo 2 folder.
Creative AWE 32 drivers
The Win95 setup will detect and install drivers for the AWE 32 sound card, however it is recommended they are upgraded.
In Drivers for Creative Labs Sound Blaster Sound Cards the latest updates for the Sound Blaster 16, 32 AWE 32 and 64 for Win95 and Win98 are available in the sbw9xup.exe file.
The sbw9xup.exe file can be opened in Win10 with 7zip, and the files extracted to an AWE32 folder. This AWE32 folder should be copied to the VM hard disk. The upddrv95.exe file within this AWE32 folder should be run within Win95 on the VM.
Creative AWE 32 device conflict
The Creative AWE 32 has a Creative Advanced Wave Effects Synthesis for AWE 32 MIDI device which is listed in Device Manager, under the Sound, video and game controllers.
If this is listed as not working, then uncheck the Use automatic settings checkbox and ensure Basic configuration 0000 is chosen in the dropdown menu, (as shown in the screenshot below), to fix the problem.

AmnHLT driver
The AmnHLT driver is an optional driver which may help squeeze a little more performance out of the emulated hardware.
Driver and Installation instructions have been covered previously and apply to a Win95 VM in PCem as well.
This concludes the PCem VM setup and install.
Preserving the virtual machine
At this point we have a clean Win95 virtual machine using optimised device drivers. It is recommended to take a copy of the PCem VM configuration and the virtual hard disk (vhd) file.
This provides a clean VM you can use with other 3Dfx/Glide games which run best under Win95, without having to repeat the above to create the VM.
Serial/parallel port issue
When starting a the clean VM (or a copy of the clean VM), on first boot go into the bios setup and ensure the serial and parallel ports are disabled. These ports can get reset to default values, so if they are enabled, then disable them.
F22 overview
The rest of this article covers the build of F22 ADF. This build will be installing and patching F22 ADF using the English language and Glide graphics version, followed by installing and patching F22 RSO as described in the earlier, F22 Air Dominance Fighter part 1: Primer.
All patches covered below can be found on this post, DID F22 Games Collection on Krishty’s Sim Forums.
Installing F22 ADF
The game was installed from a cd image mounted in PCem. The installation was straightforward, but the following notes may be useful:
The English language version was selected.
The default installation location was used: D:\Program Files\DID\F22 ADF
A typical installation was selected as it will make a complete/full install of F22.
The VM may not have the correct DirectX 5 components required, so DirectX 5 should be installed.
Glide was selected as the Graphics API.
After files have been copied, a few more questions are asked.
When asked about audio, sound fx and speech can be checked but music should be unchecked. The music is still installed but it is disabled and can be enabled later. This helps prevent issues when the game is first run.
For joystick or keyboard, select keyboard the joystick can be configured later.
Viewing the readme is a personal preference.
Once complete Win95 will be restarted.
Patching F22 ADF
The recommended v5.144 patch was installed next, using the English language, Glide version of the patch. The following steps were taken:
The patch executable was extracted from the zip file using 7zip in Win10.
The VM was shutdown and the VM hard disk mounted in WIn10.
The patch executable was copied into the D:\Program Files\DID\F22 ADF\Program folder.
The VM hard disk was ejected from Win10 and the VM restarted.
The v5.144 patch was run.
IMPORTANT NOTE: The v5.144 patch is completely silent. There is no indication it is running or working. This is very unusual, and you may think the patch has failed or not started. When running, you may see temporary files being created in the \F22 ADF\Program folder. When the following patch readme files exist, the patch has completed:
patch.txt
patch.rtf
Installing F22 RSO
The expansion was installed from a cd image mounted in PCem. The installation was straightforward, but the following notes may be useful:
The English language version was selected.
The patched version was selected.
The Glide version was selected.
The F22 RSO installer should automatically find the installation folder and begin the installation/patching process.
Patching F22 RSO
The recommended RSO training mission fix was the final patch to apply, with the following steps:
The patch executable was extracted from the zip file using 7zip in Win10.
The VM was shutdown and VM hard disk mounted in Win10.
The patch executable was copied into a folder (e.g. My Documents). When run the patch will automatically find the F22 ADF installation folder.
The VM hard disk was ejected from Win10 and the VM restarted.
The RSO training mission fix was run.
This patch is not silent but it is very quick. You will not see any files being patched or updated, this is normal.
PCem VM or Win10
The next section covers running and configuring F22 ADF within the PCem Win95 VM. You may be wondering why, if the game can be run in Win10 natively?
In Win10, some of the menus look a little messed up due to the incompatibilities between modern DirectX and the legacy DirectX 5 used by F22 ADF. The menus themselves are completely functional and the flight engine works perfectly with no graphical issues. However, some may prefer the PCem VM approach over Win10.
Another reason may be the subjective 'feel' of the controls. With my particular HOTAS setup the controls 'feel' fractionally better/tighter under Win10. Your own subjective 'feel' of your own HOTAS may differ, and you may prefer to play in PCem.
The important thing is that both approaches are covered, so you can try them both and stick with the one you prefer.
Running and configuring F22 ADF
Once the VM is restarted, F22 ADF can be run from the Win95 Start menu. After a short delay, you should see the F22 ADF splash screen and you'll be asked to create or select a pilot.
If this is the first time the game is run and it doesn't seem to start. There may be a problem with the game configurations options stored in (assuming the default location was used):
C:\Program Files\DID\F22ADF\Program\game.cfgThis file can be deleted and the game restarted. This file will be recreated with default config options which should allow the game to start.
Setting game options and checks
The next step is to set the in-game Options, all options can be maximised as shown in the options menu screenshot below. Keyboard should remain selected until the joystick is properly configured in the VM (see HOTAS config).
If you enabled sound fx, speech or music you may need to restart the game before these changes take effect.
Next, open up the Tour of Duty menu. You should be able to scroll through the standard tours and the expansion tours including AWACS and Saudi tours. If you can see these tours (see screenshot) the expansion was installed correctly.
Finally, open up the Simulator menu. You should be able to see the standard training missions (see screenshot). If you can see these training missions the F22 RSO expansion, training mission fix was applied correctly.


CD audio
If your retail cd contained a cd music track and this cd was ripped to bin/cue cd image pair to preserve the cd music, this cd music is available. If the cd image is left mounted in the Win95 VM cd drive then cd music will be used when the game starts.
Authentic MIDI music
At present PCem is using the default Microsoft synth as the default MIDI device. This means the F22 MIDI music probably doesn't sound quite right. This next section covers changes to fix that.
Important note: The F22 ADF cd image should NOT be mounted in the Win95 VM. We want to hear the MIDI music, not the cd music track! Once the MIDI is fixed we can remount the F22 ADF cd image.
The first step is to download and install VirtualMIDISynth, as described in the article, DOSBox Staging and VirtualMIDISynth. The DOSBox Staging config section can be ignored, as we aren't using DOSBox.
Once installed, we can get the F22 soundfont and configure it for use in VirtualMIDISynth.
Using the F22 soundfont
The legacy Creative AWE 32 sound card could be made to load a soundfont, when a game was started. F22 ADF supplies it's own soundfonts (in fact it has three!), so when F22 was started, the soundfont would be loaded into AWE 32 memory, for use in game.
F22 ADF has three soundfonts, one for each of the AWE 32 memory configurations, as described below:
File | Size | Used with AWE 32 model with |
tfx3512.sf2 | 443 KB | 512 Kb memory. |
tfx31meg.sf2 | 897 KB | 1 MB memory. |
tfx3.sf2 | 1.4 MB | 2 MB or more memory. |
Before starting, you may wish to consider a single location in Win10 for keeping all of your soundfonts together, as described in DOSBox midi.
As PCem cannot automatically load a soundfont into a virtual AWE 32, we set this manually in VirtualMIDISynth. To do so:
Shutdown the Win95 VM and mount the VM hard disk in Win10.
Copy one or more of the soundfonts (if choosing one, the largest, tfx3.sf2 is recommended) into your soundfonts folder or other suitable location in Win10. The F22 soundfont files can be found on the Win95 VM hard disk in:
C:\Program Files\DID\F22ADF\ProgramEject the Win95 VM hard disk from Win10.
Run the VirtualMIDISynth Configurator app.
Add the F22 soundfonts to VirtualMIDISynth and select one of them (as shown below).

A default MIDI device for PCem

With VirtualMIDISynth installed and an F22 soundfont ready for use, the next step is to tell PCem to use VirtualMIDISynth instead of the default Microsoft Synth MIDI device. The steps to follow are:
Shutdown the Win95 VM and the PCem emulator, this allows PCem to pick up a newly installed VirtualMIDISynth.
Run PCem and go to the configuration options for the Win95 VM.
Go to the sound card configuration options and click the AWE 32 settings button.
From the MIDI out device menu, select VirtualMIDISynth (as shown above).
Important note: After selecting VirtualMIDISynth, PCem may continue to use the default Microsoft Synth device, leaving the MIDI music unchanged. This issue may or may not affect you, as everyone's PC hardware is slightly different. I encountered this issue but others may not.
If VirtualMidiSynth is being used and the MIDI music sounds authentically like F22 then the process is complete (this test video may help you determine this). If not, then continue onto the MIDIMapper section below.
MIDIMapper
For installation instructions and integration with VirtualMIDISynth, take a look at the earlier article, VirtualMIDISynth and MIDIMapper.
CoolSoft, the creators of MIDIMapper and VirtualMIDISynth always recommend setting the MIDI out device in the app first (in this case PCem). If this doesn't work then MIDIMapper should be tried, so the steps above were important.

To configure PCem to use the MIDIMapper, follow these steps:
Install and configure the MIDIMapper to use VirtualMIDISynth, as described in VirtualMIDISynth and MIDIMapper.
Shutdown the Win95 VM and the PCem emulator, this allows PCem to pick up a newly installed MIDIMapper..
Run PCem and go to the configuration options for the Win95 VM.
Go to the sound card configuration options and click the AWE 32 settings button.
From the MIDI out device menu, select CoolSoft MIDIMapper (as shown above).
HOTAS config
Joystick, throttle and rudder pedals are supported. Configuring axes may not be required if your HOTAS has 4 axes or less. When using devices totaling more than 4 axes, a virtual controller can be used, limited to 4 axes.
For those using controllers from multiple vendors, the vJoy/Joystick Gremlin combination may be required instead of vendor specific HOTAS profile software.
The physical axes to Windows axes were configured as follows:
Physical axis | Windows axis |
Joystick x-axis | DX_X_AXIS |
Joystick y-axis | DX_Y_AXIS |
Throttle | DX_Z_AXIS |
Rudder | DX_XROT_AXIS |
Once configured, the Controllers and retro sims part 5: PCem article provides detailed instructions on how to configure multi-axes controllers within PCem and how to create a custom controller with a Win98 VM (the Win95 VM process is identical).
All that remains is to start F22 ADF and in the Options menu, a Joystick option should be available for selection.
Example video
Finally...
Credit and huge thanks to Krishty and Menrva for the F22 ADF patches and patch info, the CoolSoft devs for bring MIDI control back into Win10 and Phil of PHILSCOMPUTERLAB.COM for finding and hosting the legacy Windows drivers and for his excellent PCem tutorial video. And not forgetting Sarah Walker for PCem v17.
And Happy Birthday to EF2000 as it turns 30! The next article will take the F22 ADF build created in this article and configure it for use within Win10 natively!
Good hunting!
Thanks! I'd love to use F-22 Total Air War in PCEM with Windows 98. As a suggestion, maybe you could do in the future a guide, with patches and mods.