Falcon 4.0 part 9: The SuperPak BMS releases (DRAFT)
- Sep 13, 2025
- 11 min read
Updated: Oct 12, 2025
DRAFT ONLY: There are no links to any of the BMS patches, awaiting responses to queries. To be updated when appropriate.

This is a guide on building and running the SuperPak 4/(early) BMS release of Falcon 4.0.
This guide will only be covering retro BMS v1.0 and v2.0 releases.
The current Falcon BMS v4.3x release can be found on the Benchmark Sims, Falcon BMS homepage.
History

Following the release of SuperPak 3, the BenchMarkSims team was created to update the graphics engine of Falcon 4.0. At this point in time the licence was held by G2Interactive but would be returned to Atari if no product was released.
The BMS updates are compatible with SuperPak 3. Beta releases starting with v0.5 began in September 2003 until the final beta, v0.99 in November 2003. The first major release was BMS v1.0.0 in December 2003, with the final v1 release (v1.0.3) in January 2004.
The only release of BMS v2.0.0.3 was in May 2004. Around the same time the Falcon 4.0 licence returned to Atari who requessted the BMS v2 release be removed from public access.
After the release of SuperPak 4, additional compatibility patches were created for BMS v1. The final compatibility patch being SP4.1 BMS data 1.4 in July 2004.
A single SuperPak 4.2 BMS v2 compatibility patch, SP4.2 BMS data 1.0 was released in November 2004.
For a far more detailed and accurate description, The Falcon Epopee is highly recommended.
Why two releases?
There are two releases with the recommended Win10 release using BMS v1.0.3.. BMS v2.0.0.3 installs and can be played, however the z-buffering (which can be turned off in BMS v1), is mandatory in BMS v2 and causes texture issues, with textures missing/transparent or in the wrong order.
I've also tested BMS v2 on a WinXP legacy machine with an nVidia 9800 GTX and the texture issue wasn't present.
Wrappers either cause more problems or don't fix the issue alone. It requires a combination of DxWrapper and ReShade to partially fix the textures in flight, however they remain broken in the menu screens and in the ACMI utility.
The Falcon 'dance'
The Falcon dance is name given to the rather involved process in building a Falcon 4.0 release given the huge number of patches, skins, cockpits, terrain and theaters that could be installed. Below is the summary of the dance involved in building BMS v1 and BMS v2.
When building either release optional skins, cockpits or terrain must be installed before the BMS update. BMS uses a different texture mechanism so these optional patches must be added before BMS converts their textures.
BMS v1.0.3
To build the BMS v1.0.3 release the following steps are required:
Install the retail release from cd or cd image.
Update to the last official patch, v1.08us.
Update to SuperPak 4 (not 4.2) using the SuperPak 4 installer.
Update to the unofficial SuperPak 4.1a using SP4.1 BMS data v1.4.
(Optional) Install any skins, cockpits, HiTiles terrain.
Update to BMS v1.0.3 using the installer.
Apply the SuperPak 4/BMS v1.0.3 compatibility patch, using SP4.1 BMS data v1.4.
I believe (but not 100% sure) that installing the unofficial SuperPak 4.1a update allows the High Fidelity Flight Models (HFFM) to be added as a patch with the BMS config editor.
BMS v2.0.0.3
Building the BMS v2.0.0.3 is a little easier. To build this release the following steps are required:
Install the retail release from cd or cd image.
Update to SuperPak 4.2 using the One Click Installer (OCI).
(Optional) Install any skins, cockpits, HiTiles terrain.
Update to BMS v2.0.0.3 using the installer.
Apply the SuperPak 4.2/BMS v2.0.0.3 compatibility patch, using SP4.2 BMS data v1.0.
Apply the BMS v2 radar fix.
High Fidelity Flight Models (HFFM) are included in SP4.2 BMS data v1.0 and can be added with the BMS config editor.
BMS v1.0.3
Prerequisites
The folder prerequisites are listed below:
C:\Falcon4-setup\utils\joystick-gremlin
C:\Falcon4-setup\utils\cinepak
C:\Falcon4-setup\patches\official
C:\Falcon4-setup\patches\superpak
C:\Falcon4-setup\patches\bms
Release patches
The following patches are required for this build:
The last official v1.08us patch (f4108us.zip).. Copy this to C:\Falcon4-setup\patches\official.
The SuperPak 4 installer. (FalconSP4_Installer.zip) Copy this to C:\Falcon4-setup\patches\superpak.
The SP4.1 BMS data 1.4 patch. Copy this to C:\Falcon4-setup\patches\bms.
The BMS v1.0.3 installer. Copy this to C:\Falcon4-setup\patches\bms.
Starting point
The starting point for the release is the cd retail release patched with the last official patch. Building this release is covered in the article, The official patched version.
Building
The first part of this build requires installing the SuperPak updates. The steps to follow are:
Extract the contents of the SuperPak 4 installer, FalconSP4_Installer.zip and run the installer executable, FalconSP4_Installer.exe.
The installer will run the Config editor/F4Patch utility. Check the SuperPak 4 patches, Apply the patches and Exit the installer. SuperPak 4 is now installed.
Extract the contents of SP4.1 BMS data 1.4 patch, (SP4.1BMSdataV1.4.zip) and run the unofficial update executable, SP4.1aUnofficialUpdate.exe.
The installer will run the Config Editor/F4Patch utility. Check the SuperPak 4.1 update patches, Apply the patches and Exit the installer. SuperPak 4.1 is now installed.
The optional second part of the build, is when any optional cockpits, skins, and/or terrain updates can be applied. For example, this is when HiTiles would be installed.
Theaters should NOT be installed at this point.
The final part of the build is the installation of BMS. The steps to follow are:
Extract the contents of the BMS installer, F4-BMS1.03-Setup.zip and run the installer executable, F4-BMS1.03-Setup.exe. Exit the installer once complete.
The F4-BMS Config Editor will run. If the executable isn't set to F4-BMS.exe, then Browse and select it. In the Editor, tick the '(SP) Falcon Configuration' check-box, Apply the patches then Exit the program.
From SP4.1 BMS data 1.4 patch, (SP4.1BMSdataV1.4.zip), run the SuperPak 4.1/BMS data update, SP4.1BMSdataV1.4.exe.
Run the F4-BMS Config Editor. In the Editor, select and tick the update patches check-boxes, Apply the patches then Exit the program.
HOTAS config
The HOTAS config remains unchanged from the SuperPak HOTAS config, with the in-game throttle axis set to the slider axis. The vJoy/Joystick Gremlin combination continues to be used. The vJoy configuration is set to use the slider axis, as shown. This enables the throttle within the game.


Graphics config
The nVidia control panel was used to try and optimise the graphics, identical to the SuperPak release graphics config . In the Manage 3D Settings a new program entry was added for FalconSP.exe. The following limited settings were used:
Image Scaling: On
Antialiasing Mode: Enhance the application setting
Antialiasing Setting: 8x
There may be far better settings, in which case feel free to let me know! I'm assuming there is similar functionality in software supplied with AMD/Intel graphics cards.
Video patching
Video patching remains unchanged from The official and iBeta releases. The intro video and campaign videos both work well in Win10.
Track IR Support

Track IR support is built into BMS. With BMS v1.0.3, Track IR support is enabled through the F4-BMS Config Editor as shown. Track IR can be enabled for both 2D and 3D cockpits.
Track IR pitch/yaw percentages and sample frequency can be adjusted through the F4-BMS Config Editor as shown.
The Track IR software should be running before starting the game. It is still recommended to use the Yassy BMS profile.
The Yassy profile is available from the Falcon BMS forum in the TrackIR 4/5 BMS Profile by Yassy topic. The first message uses a Dropbox location, however there are multiple alternatives throughout the thread.
Running
With the change in executable the command to run Falcon 4.0 becomes:
F4-BMS.exeIn-game config
here are issues to be aware of when configuring the settings.

If texture issues occur you may try switching the video card option to Direct3D HAL.
The SuperPak Fast 2D-Cockpit has been renamed to Rendered 2D Cockpit. It should be disabled for improved cockpit visuals.
Z-Buffering should be disabled to prevent texture issues.
Texture Quality can be set to DDS Pool, a set of pre-compiled textures that can improve frame rates. To use this option the Compress Texturess should be clicked and then select Apply. Compressing the textures can take a few minutes or longer.
Realistic avionics
This issue remains from SuperPak. In the SIMULATION settings, Avionics must be set to Realistic to prevent text problems on the DED.
Documentation
The SuperPak release documentation is also available in this release, in the Docs folder. There is an additional BMS manual, F4-BMS Manual.pdf.
The same manuals that should be read in conjunction with the SuperPak manuals apply to this release and the BMS manual as well.
The SuperPak ramp start trainer also remains available.
Example video
BMS v2.0.0.3
Prerequisites
The folder prerequisites are listed below:
C:\Falcon4-setup\utils\cinepak
C:\Falcon4-setup\patches\superpak
C:\Falcon4-setup\patches\bms
Release patches
The SuperPak 4.2 One Click Installer (OCI). (SP42_OCI.zip) Copy this to C:\Falcon4-setup\patches\superpak.
The BMS v2.0.0.3 installer (F4-BMS_2.0.zip). Copy this to C:\Falcon4-setup\patches\bms.
The SuperPak 4.2/BMS v2.0.0.3 patch (Sp4.2_BMS_DATA_v1.0.zip). Copy this to C:\Falcon4-setup\patches\bms.
The BMS 2.0 radar fix patch (BMS2.0ALLversionsradarfix.rar). Copy this to C:\Falcon4-setup\patches\bms.
Starting point
The starting point for the release is the cd retail release which will require patching with SuperPak 4.2 or a completed SuperPak 4.2 build. Creating the SuperPak 4.2 build is covered in the article, The SuperPak release.
Building
Assuming the starting point is a SuperPak 4.2 release, the building process is relatively straight-forward.
The first optional step is the installation of any 'old style' cockpits, skins or terrain that were built for a SuperPak or earlier release. BMS uses a different texture mechanism, so old style textures will be converted to BMS textures during the BMS install and can't be added afterwards.
The steps are then:
Extract the contents of the installer zip file (F4-BMS_2.0.zip) and run the installer, F4-BMS_2.0-SETUP.exe.
Once installed the LxFixer and TexCompress tools will run, allow them to complete.
The F4-BMS Config Editor will run. Ensure the executable in the editor is set to F4-BMS.exe.
Tick the (SP) Falcon Configuration patches and Apply them.
Select any additional patches, Apply them and Exit the Config Editor.
Extract the contents of the SuperPak 4.2/BMS v2.0.0.3 patch zip file (Sp4.2_BMS_DATA_v1.0.zip) and run the installer, Sp4.2_BMS_DATA_v1.0.exe.
Open the F4-BMS Config Editor. Tick the SP4 BMS patches and select any required sub patches. Apply them and Exit the Config Editor.
Extract the contents of the BMS 2.0 radar fix rar file (BMS2.0ALLversionsradarfix.rar) and run the installer, BMS2.0 ALL versions radar fix.exe.
The F4Patch utility will be opened. Ensure the executable in the editor is set to F4-BMS.exe.
Select the BMS 2.0.0.3 Radar Bug Fix, Apply it and Exit the F4Patch utility.
HOTAS config
BMS v2.0.0.3 has native controller support which means it can use the controller devices present in Windows. For those with separate stick, throttle and rudder pedals, each axis for each device can be configured in game. BMS v2.0.0.3 even supports axis shaping so vendor profiling software may not be needed at all (see In-game config).
This also means the vJoy/Joystick Gremlin combo used inn earlier builds is no longer necessary or recommended.
However as a test, a TM TARGET profile was added, this may provide higher precision than the default precision provided by Windows, so may feel 'subjectively' better. The axes were configured as follows:
Physical axis | DX axis |
Stick x-axis | DX_X_AXIS |
Stick y-axis | DX_Y_AXIS |
Throttle | DX_Z_AXIS |
Throttle (2nd engine) | DX_ZROT_AXIS |
Throttle slider | DX_SLIDER_AXIS |
Rudder pedals | DX_XROT_AXIS |
Due to the ability to split the throttle for twin engined aircraft, DX_ZROT_AXIS is assigned as a second throttle axis.
This means an axis is required for the rudder pedals, in this case DX_XROT_AXIS. In the game configuration menus, this axis is assigned as the rudder (see In-game config).
Wrapper config
DirectX wrappers alone cannot solve the BMS v2.0.0.3 texture issues under Win10. It takes a combination of DxWrapper and ReShade to get working textures in the flight engine only, with the textures remaining broken in menus and the ACMI utility,
DxWrapper
This build uses the latest version of DxWrapper, v1.4.7900.25. It can be found on the DxWrapper GitHub repository, in the Releases section. Credit and thanks go to Elisha for continued work on DxWrapper.
DxWrapper is used to provide compatibility and conversion to DirectX9 only. It is not used to make enhancements. The DxWrapper configuration file used in this build:
To install, the following DxWrapper files were copied into the Falcon installation folder:
ddraw.dll
dxwrapper.dll
dxwrapper.ini
ReShade
This build uses the latest version of Reshade, v6.5.1. It can be found at the ReShade website. Reshade is intercepting the DirectX9 calls and with it's depth buffers handling, it is able to display the textures properly.
ReShade just needs to be installed using the DirectX9 API (provided by DxWrapper) and that is sufficient. Like DxWrapper, ReShade is not used to make enhancements, so addons and effects don't need to be selected.
Once you have confirmed the textures are displayed correctly you may wish to add ReShade enhancements like antialiasing.
To install:
Copy ReShade_Setup_6.5.1.exe into the Falcon installation folder and run this installer.
Select the F4-BMS.exe file aas the executable
Select DirectX 9 as the API.
The remaining defaults are sufficient.
To test, run F4-BMS.exe and select the Tactical Engagement and the lesson 02 Takeoff. This will start on the runway, giving you lots of time to check out ReShade without having to worry about flying.
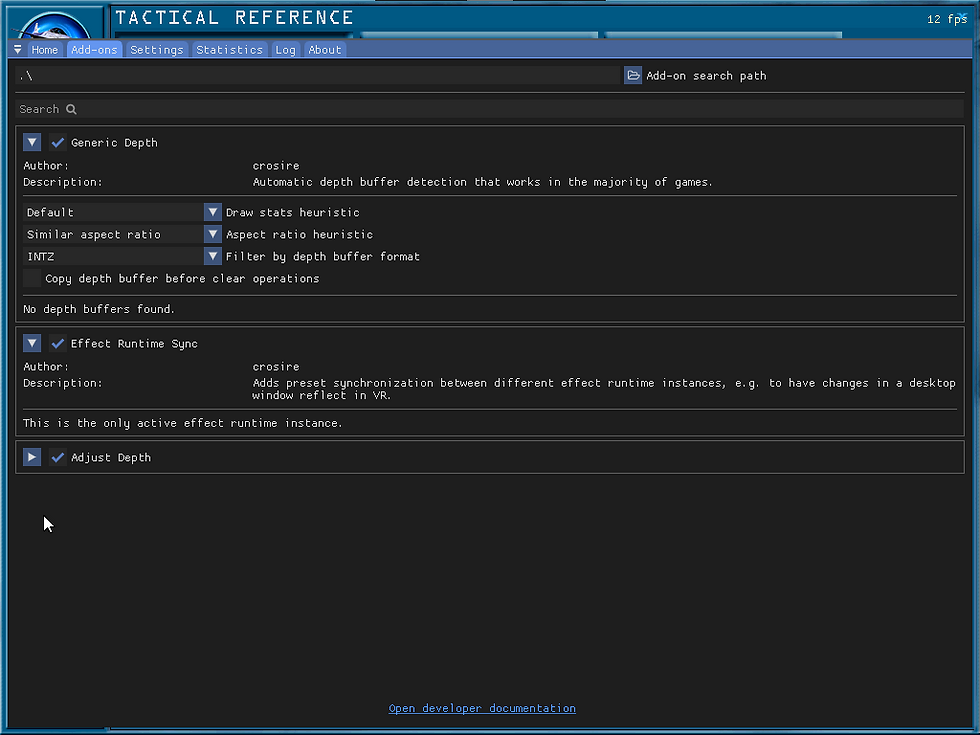
Switch to the Orbit or Chase external views. The textures should be displayed correctly. If not open the ReShade overlay, open the Addons section and ensure in the General Depth section, a depth buffer is shown.
Checking for a depth buffer must be done within the flight engine as no depth buffers can be found within the menu screens.
Video patching
Video patching remains unchanged from The official and iBeta releases. The intro video and campaign videos both work well in Win10.
Track IR Support
Track IR support is built into BMS. With BMS v2.0.0.3, Track IR support is enabled through the in-game configuration menus. Track IR can be enabled for both 2D and 3D cockpits.
The Track IR software should be running before starting the game. It is still recommended to use the Yassy BMS profile (see Track IR Support above).
Running
With the change in executable the command to run Falcon 4.0 becomes:
F4-BMS.exeIn-game config
The following is brief look at some of the most noteworthy config options for running under Win10. For a more detailed explanation the FreeFalcon manuals should be consulted.
Graphics options

Graphics card selection is simplified.
Resolution can be increased to 1600x1200.
All advanced options should be selected, especially Render GM to Texture and Rendered 2D Cockpit.
Without these options there are compatibility issues with DxWrapper and ReShade.
Controller Options

The controller options allow you to specify the joystick device and test the calibration.
If you were using native controller support you should select your joystick device.
As I was testing with a virtual controller that is shown as the device in the screenshot.
The Advanced controller options are accessed from this menu.
View controls

A clickable 3D cockpit can be enabled.
Screen screen enables Track IR for both 2D or 3D cockpits.
Custom axis shaping can also be enabled.
Flight controls

The rudder and throttle controls can be set on this page.
If you were using native controller support you would select your rudder and throttle devices and appropriate axes.
As I was testing a virtual controller the axes shown are virtual controller axes. In the screenshot my rudder is set to the X rotation axis described earlier in HOTAS config.
Avionics controls

On this screen you can set the secondary axes, like the range and antenna dials on a TM Cougar or the slider on a TM Warthog.
Documentation
The SuperPak release documentation is also available in this release, in the Docs folder. There is an additional BMS manual, F4-BMS_2.0-Manual.pdf.
The same manuals that should be read in conjunction with the SuperPak manuals apply to this release and the BMS manual as well.
The SuperPak ramp start trainer also remains available.
Example video
Finally...
Credit and thanks go to the BenchMark Sims Team for the BMS updates and the individuals who have provided additional SuperPak compatibility patches.
Good hunting!


Comments